How to change the IP address on Android/iPhone for free?
Welcome to Blackview (Well-known brand of water-, drop-, shock-, dust-proof rugged smartphones, here are our rugged phones for sale) blog. Hope this "changing IP address" guide has been helpful.
Changing your IP address can provide various benefits, such as accessing region-restricted content, improving online privacy, or troubleshooting network issues. While IP address changes are typically managed by your internet service provider (ISP), there are methods to change your IP address on your Android or iPhone for free (without VPN). In this comprehensive guide, we will explore step-by-step instructions for changing your IP address on both platforms, enabling you to take control of your online experience.
Section 1: Changing IP Address on Android
- Connect to a Wi-Fi Network:
Ensure your Android device is connected to a Wi-Fi network. Changing the IP address on mobile data connections is generally not possible. - Access Wi-Fi Settings:
Go to the "Settings" menu on your Android device and select "Wi-Fi" or "Network & Internet" (depending on the Android version). - Modify Wi-Fi Network Settings:
Long-press on the Wi-Fi network you are connected to and select "Modify Network" or "Modify Network Configurations." - Show Advanced Options:
Scroll down and select the option to "Show Advanced Options" or "Advanced Settings." - Change IP Settings:
Look for the "IP Settings" dropdown menu and select "Static" or "Static IP" instead of the default "DHCP" or "Automatic." - Input New IP Address Details:
Enter the desired IP address, subnet mask, gateway, and DNS server details. You can obtain these details from your ISP or network administrator. - Save Changes:
Tap "Save" or "Apply" to save the new IP address settings. Your Android device will now use the specified IP address.
Note: Usually, it is safe to use Wi-Fi at your home. There will be some security risks when use public Wi-Fi, here provides a guide on "How to safely use public wifi?" to reduce the security risks.
Related Wi-Fi guides,
- How to fix your phone/iPhone has connected to WiFi but no internet?
- My phone/iPhone no internet access or Can't connect to wifi, how to fix?
- How to find wifi password on phone when connected?
- How to reset wifi router password?
- Do Delta Air Lines have wifi?
- Do airlines have Wi-Fi? Can I use Wi-Fi on my airplane?
- Can IMEI be tracked through wifi?
- Will Bluetooth work without WiFi or cellular internet?
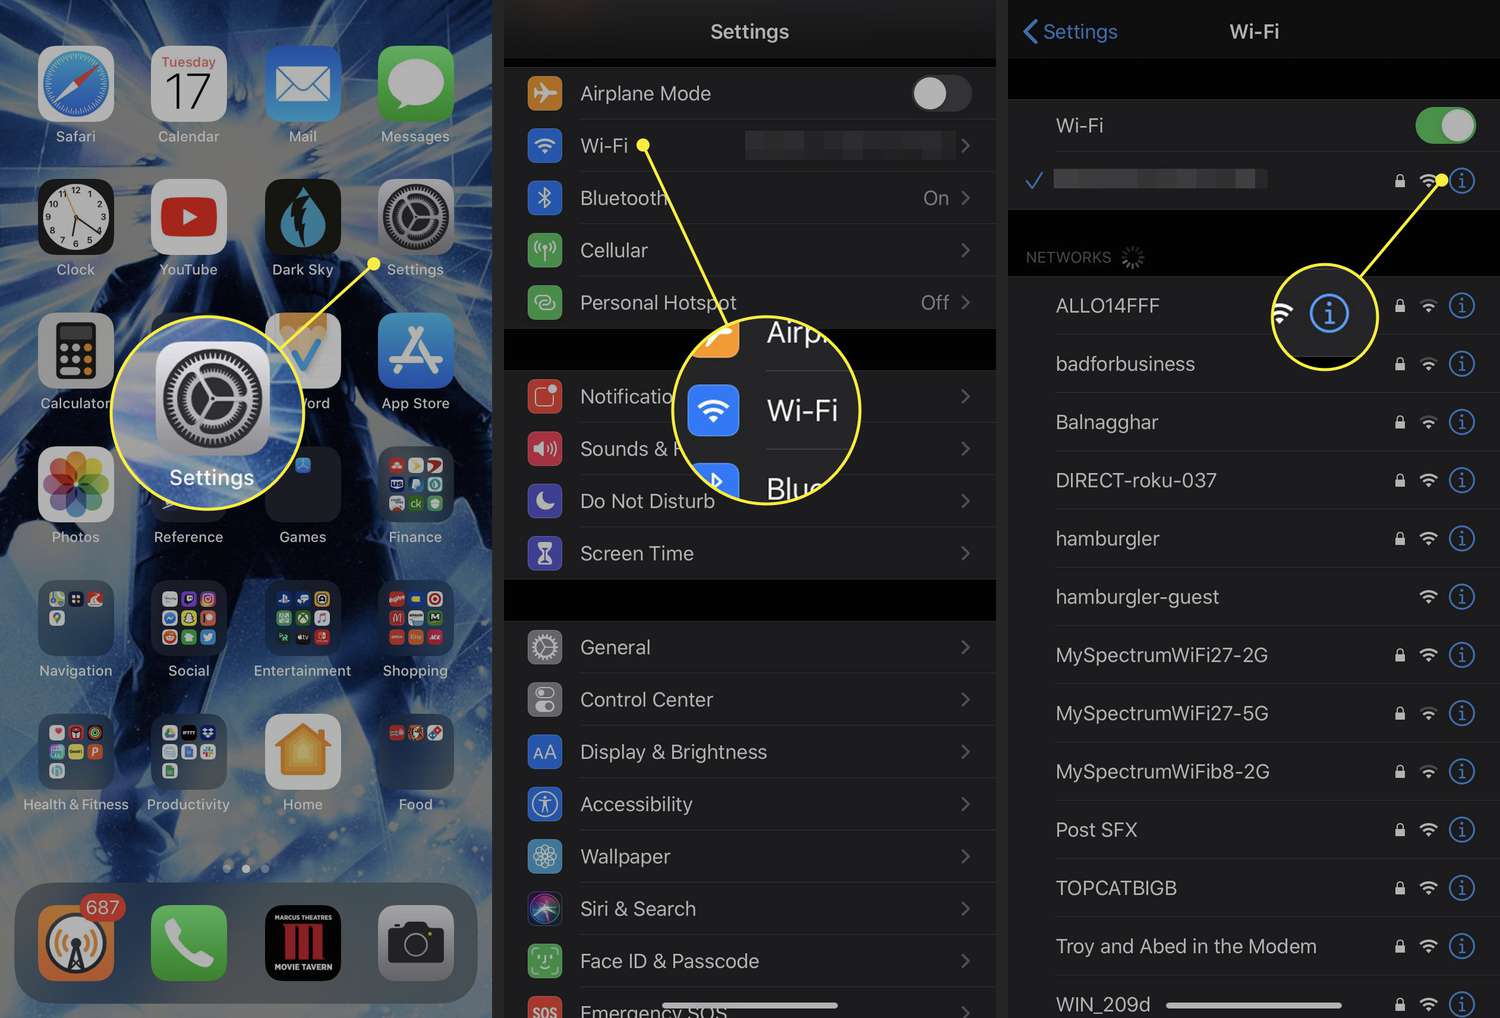
Section 2: Changing IP Address on iPhone
- Connect to a Wi-Fi Network:
Ensure your iPhone is connected to a Wi-Fi network. Changing IP address settings on cellular data is generally not possible. - Access Wi-Fi Settings:
Open the "Settings" app on your iPhone and select "Wi-Fi." - Modify Wi-Fi Network Settings:
Tap the (i) icon next to the Wi-Fi network you are connected to. - Configure IP Settings:
Scroll down and locate the "Configure IP" or "IP Address" option. - Change IP Address to Manual:
By default, it is set to "Automatic." Tap on "Manual" to switch to manual IP address configuration. - Input New IP Address Details:
Enter the desired IP address, subnet mask, router, and DNS server details. Obtain these details from your ISP or network administrator. - Save Changes:
Tap "Save" or "Apply" to save the new IP address settings. Your iPhone will now use the specified IP address.
- Read also, Apple Watch cellular vs GPS: What are the differences?
- The most budget Android phones that look similar to iPhone 13 and 13 Pro Max in the market.
By following the step-by-step instructions in this guide, you can change the IP address on the Android phone or iPhone for free. Remember that these methods only change the IP address of your device within the local network and do not alter your public IP address assigned by your ISP. Changing your IP address can provide additional flexibility and control over your online experience. Always ensure that you comply with applicable laws and regulations while changing your IP address, and use this knowledge responsibly to enhance your internet usage.
Paid Method: Using a VPN
Virtual Private Networks (VPNs) are the most reliable and secure way to change your IP address. They route your internet traffic through a remote server, masking your location and offering several benefits:
- Enhanced Privacy: Encrypts your internet traffic, protecting your data on public Wi-Fi.
- Access Geo-restricted Content: Connect to servers in different countries to access region-locked content.
- Improved Security: Provides an extra layer of protection against online threats.
Choosing a VPN:
- Consider reputable VPN providers with strong encryption.
- Look for features like a large server network and fast speeds.
- Many VPNs offer free trials, allowing you to test the service before committing.
Using a VPN to Change IP Address:
- Choose a reputable VPN provider (research online for reviews and comparisons).
- Download and install the VPN app on your Android or iPhone.
- Launch the app and sign in with your account credentials.
- Select a server location from the available options.
- Connect to the VPN server. Your IP address will be changed to reflect the chosen server location.
Related VPN guides,
- Do Android devices have a built-in VPN?
- Why VPN is not working on your phone?
- Is it safe to use VPN in your phone?
In Conclusion
While free methods exist for changing your IP address, they come with limitations and security risks. A VPN is the most recommended approach, offering enhanced privacy, security, and reliable access to geo-restricted content. Remember to choose a reputable VPN provider that meets your needs.